Blog
Posts Tagged ‘Wheel Stops’
Thursday, December 1st, 2011
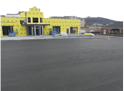
Like the cover of a book, the exterior of your building and your parking lot are what your customers base their first opinions on. I know, I know…don’t judge a book by its cover. Well, guess what? People still do. That is just the way it is. And you only get to make one first impression, so it is important to make it a good one. After all, who wants to lose business because their parking lot is a mess?
New paint, signs and wheel stops give your parking lot a “WOW” factor. Unfortunately, this wow factor doesn’t last forever.
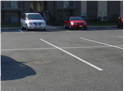
Your parking lot striping wears away over time, which is why re-striping is the most common and routine type of asphalt maintenance. As soon as the paint is applied to your parking surface, it begins to deteriorate. This deterioration is sped up by such factors as severe weather, the amount of traffic coming in and out of the lot, and the thickness of the paint.
So how often should you re-stripe your parking lot?
Because of the deteriorating paint, the relatively low cost of re-striping, and the instant curb appeal it provides, it is recommended that you re-stripe your parking lot every 12-18 months. And as long as the temperature is above freezing, striping can be performed year-round.
So if your parking lot is in desperate need of a little TLC, contact an experienced asphalt company today – a company like PTG Enterprises. The asphalt experts here have managed hundreds of these projects and have the experience you need. So contact PTG Enterprises aka My Pavement Guy today by calling 410-636-8777 or click here today!
Give me the opportunity to impress you. I can be your one stop ‘Pavement Guy,’ for any pavement project regardless of size or scope.
Check us out on Facebook and Twitter as well!
Tags: asphalt experts, Asphalt Maintenance, customers, deteriorating paint, don’t judge a book by its cover, experienced asphalt company, experienced asphalt contractor, exterior of your building, first impression, how often should you re-stripe your parking lot, instant curb appeal, lose business, low cost of re-striping, My Pavement Guy, New paint, Parking lot, parking lot is a mess, parking lot striping, parking surface, pavement project, PTG Enterprises, re-stripe your parking lot, Re-striping, severe weather, signs, striping, The Importance of Parking Lot Striping and Re-Striping, Traffic, Wheel Stops
Posted in Asphalt Maintenance, General Asphalt Advice, Maryland Asphalt Contractor, Parking Lot Maintenance, Parking Lot Re-Striping, Parking Lot Striping, Pavement Maintenance | Comments Off on The Importance of Parking Lot Striping and Re-Striping
Friday, June 24th, 2011
It’s a hole in the road. How hard can it be to fill a hole, right? Well, you might be surprised. Pothole repair is tough work and requires a trained crew and some specialty equipment. This article from PaveManPro.com explains the lengthy repair process.
How to repair a pothole:
1. With a pavement saw or pneumatic hammer, cut the outline of the patch, extending at least 0.3 m (I ft.) outside of the distressed area. The outline should be square or rectangular with two of the sides at right angles to the direction of traffic.
2. Excavate as much pavement as necessary to reach firm support. If a patch is to be an integral part of the pavement, its foundation must be as strong or stronger than that of the original roadway. This may mean that some of the sub-grade will also have to be removed. The faces of the excavation should be straight and vertical.
3. Trim and compact the sub-grade.
4. Apply a tack coat to the vertical faces of the excavation.
5. Backfill with the asphalt mixture. Using a shovel or skid steer loader place the mixture directly from the truck into the prepared excavation. The maximum lift thickness largely depends upon the type of asphalt mixture and the available compaction equipment. Asphalt concrete can and should be placed in deep lifts, since the greater heat retention of the thicker layers facilitates compaction. From a compaction standpoint, patches using asphalt concrete can be backfilled in one lift. However, when placing a patch that is deeper than 3 cm (5 in.) it is often useful to leave the first lift 2.5 to 5 cm (I to 2 in.) below the finished grade, making it easier to judge the total quantity of mixture required for the patch.
On the other hand, patches constructed with mixtures containing emulsified or cutback asphalt must be placed in layers thin enough to permit evaporation of the diluents that make the mixture workable.
6. Spread carefully to avoid segregation of the mixture. Avoid pulling the material from the center of the patch to the edges. If more material is needed at the edge, it should be deposited there, and the excess raked away. The amount of mixture used should be sufficient to ensure that the after compaction the patch surface will not be below that of the adjacent pavement. On the other hand, if too much material is used a hump will raise.
7. Compact each lift of the patch thoroughly. Use equipment that is suited for the size of the job. A vibratory plate compactor is excellent for small jobs, while a vibratory roller is likely to be more effective for larger areas. When compacting the final lift (which may be the only lift), overlap the first pass and return of the vibratory roller or plate compactor to no more than 5 cm (6 in.) on to the patch on one side. Then move to the opposite side and repeat the process. Once this is accomplished, proceed at right angles to the compacted edges, with each pass and return overlapping a few inches on to the uncompacted mix. If there is a grade, compaction should proceed from the low side to the high side to minimize possible shoving of the mix.
8. When adequate compaction equipment is used, the surface of the patch should be at the same elevation as the surrounding pavement. However, if hand tamping or other light compaction methods are used, the surface of the completed patch should be slightly higher than the adjacent pavement, since the patch is likely to be further compressed by traffic.
9. Check the vertical alignment and smoothness of the patch with a straightedge or string line.
So next time you complain about that pothole down the street not getting fixed or next time you think to yourself, “hey, I could do that in half the time,” remember that pothole repair is not a quick fix. Properly patching a pothole takes time, know-how, and a lot of energy.
If you have any questions, contact PTG Enterprises by calling 410-636-8777 or click here
Check us out on Facebook and Twitter as well!
Tags: asphalt, Asphalt cracks, Asphalt driveway, Asphalt installation, Asphalt Maintenance, asphalt maryland, Asphalt repair, Asphalt repair Maryland, Bidding a Pavement Project, Contractor, crack fill, Cracking, distress, driveway, driveway pothole, driveway repair, driveway repair Maryland, failure, fill cracks, FUll-depth patching, Hiring a Contractor, How can you quickly fix a pothole in your driveway?, How do potholes happen, Maintenance, maryland, My Pavement Guy, Parking lot, patching, pave, pavement, Pavement Contractor, Pavement cracks, Pavement installation, Pavement Maintenance, Pavement Maryland, pavement repair, paving, paving contractor, paving maryland, paving project, Permanent fix, Pothole, Pothole driveway, Pothole quick fix, Pothole repair Maryland, Potholes and Repair, Preventative maintenance, PTG Enterprises, quick fix, Re-striping, re-striping asphalt, re-striping pavement, Repair, repave, repaving, reverse bidding, RFP, Sealcoating, Sigsn, Temporary fix, trouble area, troubled area, Wheel Stops
Posted in General Asphalt Advice | Comments Off on Pothole Repair: It’s a Bigger Job Than You May Think
Thursday, June 2nd, 2011
Unfortunately, even the best pavement is not indestructible. Heavy traffic usage and weather changes, along with several other outside factors, can lead to pavement distress, which is noticeable physical damage on roads or sidewalks. If not dealt with quickly, pavement distress can lead to more serious problems, all of which can significantly shorten the lifespan of your pavement.
But how can you spot pavement distress in time? This article from eHow.com explains how you can quickly identify pavement distress.
1. Assess cracks on the surface of the pavement. Alligator cracking appears as a network of cracks, forming a pattern somewhat like the skin of an alligator or wonky squares. As the U.S. Department of Transportation outlines in its “Pavement Distress Identification Manual for the NPS Road Inventory Program, 2006 -2009,” the severity of the distress can be measured. It is considered low when the width of the crack is less than 1/4 inch in width. However, the alligator distress is serious when the cracks are more than 3/4 inch wide.
2. Check the pavement’s surface for long strips of cracking. These are ruts that run either along the length of the pavement or sideways across the surface. In places where the cracks are more than 3/4 inch in width, the distress is considered serious and can buckle the pavement, causing bumps. Hot weather can cause this type of pavement distress.
3. Identify gouged-out areas or dips on the surface of the road. Pavement distress is characterised by potholes. These are concave holes on the surface, which are a nuisance for drivers. The holes can cause punctures in tires, gather water and lead to further cracking.
4. Look for dark square or rectangular patches of asphalt on the pavement. Distress can be identified by finding discolored areas where potholes or previous distress marks have been filled or covered over. The replacement asphalt causes a dark patch to be seen. Cracking, ruts or potholes can often be seen in proximity to the patching, which is indicative of pavement distress.
5. Crouch down and look across the surface of the pavement. Identify two lines of depressions in the road’s surface. If these are in the direction of the wheel paths, this distress is called rutting. Rutting occurs when continuous use of the pavement by heavy vehicles causes the surface to sink. It is classified as severe when the depressions are greater than 1 inch below the surface of the pavement.
Once you have identified pavement distress, it is time to repair the damage. There are several products available that allow you to do the job yourself, but if you want to ensure your pavement is properly fixed, it is probably best to call a professional.
If you have any questions or if you would rather leave the repair work to the professionals, contact PTG Enterprises by calling 410-636-8777 or click here
Tags: Alligator cracking, Anchor tenant, asphalt, Asphalt cracks, Asphalt installation, Asphalt Maintenance, asphalt maryland, Asphalt repair, Bid, Bidding a Pavement Project, Board Member, Budget, Building Owner, Business, Cement mix, certificate of insurance, Client, Concrete, Concrete Crack, Concrete cracking, Concrete Cracks, Concrete repair, Concrete repair Maryland, Contractor, Contractors License, Cost, crack fill, Crack in Concrete, Crack in pavement, Crack in Sidewalk, Cracking, Cracking Concrete, Cracking in sidewalk, Cracking Pavement, Cracks in Concrete, Cracks in Pavement, Cracks in Sidewalk, Do not pay full cost in advance, fill cracks, Fix, Fixing, Get it in writing, Hiring a Contractor, How to fix, How to Identify Pavement Distress, Identification, Industry, Job, Knowledge, Lot, Maintenance, Meeting, My Pavement Guy, Parking lot, pavement, Pavement Contractor, Pavement crack, Pavement Cracking, Pavement cracks, Pavement installation, Pavement Maintenance, Pavement Maryland, Pavement repair Maryland, Pavements Cracks, Pothole, Potholes, Pre-bid, Preventative maintenance, PTG Enterprises, Re-striping, re-striping asphalt, re-striping pavement, References, Repair, Repairing Lifted Concrete, Repairs, request for proposal, reverse bidding, RFP, Sealcoating, Sidewalk crack, Sidewalk Cracking, Sidewalk Cracks, Sigsn, Understanding, warranty, Wheel Stops, Work, Yards
Posted in General Asphalt Advice | Comments Off on How to Identify Pavement Distress
Wednesday, May 25th, 2011
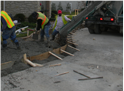
After Concrete is laid, the inevitable settling, shifting and moving will occur. But in extreme cases, when the ground settles below the concrete or when a tree root comes into contact with the pavement, walkways or patios can break and lift. These unsightly blemishes on your otherwise pristine concrete surface can ruin the entire look and feel of your patio or walkway. And with Memorial Day right around the corner, you are going to want your home to look perfect for your guests.
This article from eHow.com provides 4 ways in which you can quickly repair that broken and lifted concrete.
Instructions
1. The easiest way to repair lifting concrete pavement is to grind it down. Most driveways are at least 6″ thick by code, so there should be sufficient grinding depth. Walkways and patios are 3″ – 4″ in thickness. Renting a scarifier is probably the most practical way to do this yourself. This is not an easy machine to use, so if you are not comfortable with the job, don’t hesitate to call in a professional.
2. If the lifting is the result of tree root growth, you will have to grind your cement down repetitively as the roots will continue to push the concrete up. A better solution is to remove the concrete pavement all together, cut out the offending root(s) and re-pour the cement.
3. A quick fix would be to fill in the ‘step’ created by the raised concrete with a cement adhesive and concrete/polymer fill. Even if you carefully rough up the lower cement, this ramp-like fix will only be a temporary patch at best. It will chip away fairly quickly, especially on a driveway pavement with heavy traffic.
4. Better left to the professionals, you can float a slab of concrete that has sunk into the ground by drilling holes and pumping in a cement mix. This will literally float the slab back up with the pressure of the concrete beneath.
Now you can enjoy your Memorial Day barbeque without having to hear, “What happened to your patio!?” at least 50 times. If you have any questions or if you would rather leave the repair work to the professionals, contact PTG Enterprises by calling 410-636-8777 or click here today!
Tags: Anchor tenant, asphalt, Asphalt cracks, Asphalt installation, Asphalt Maintenance, asphalt maryland, Asphalt repair, Bid, Bidding a Pavement Project, Board Member, Budget, Building Owner, Business, Cement mix, certificate of insurance, Client, Concrete, Concrete repair, Concrete repair Maryland, Contractor, Contractors License, Cost, crack fill, Do not pay full cost in advance, fill cracks, Get it in writing, Hiring a Contractor, Industry, Job, Knowledge, Lot, Maintenance, Meeting, My Pavement Guy, Parking lot, pavement, Pavement Contractor, Pavement cracks, Pavement installation, Pavement Maintenance, Pavement Maryland, Pavement repair Maryland, Pre-bid, Preventative maintenance, PTG Enterprises, Re-striping, re-striping asphalt, re-striping pavement, References, Repairing Lifted Concrete, Repairs, request for proposal, reverse bidding, RFP, Sealcoating, Sigsn, Understanding, warranty, Wheel Stops, Work, Yards
Posted in General Asphalt Advice | Comments Off on Repairing Lifted Concrete
Wednesday, March 23rd, 2011
From the moment your asphalt is installed, it begins to deteriorate. This means that to ensure you have a top-notch parking lot for years to come, you will need to take certain steps to maintain that asphalt. This preventative maintenance will not only make your parking lot last longer, but, in the long run, it will save you money.
Here are a few simple steps you should take to keep your lot looking pristine.
Crackfill
Properly filling cracks is a job of tremendous importance. By filling a small crack properly, you will prevent that fissure from growing and becoming too big to handle by yourself. Filling small cracks saves you from paying to have large cracks repaired.
Sealcoating
This is another great way to improve the overall look of you lot while going the extra mile to protect your parking surface.
Re-Striping
Once the original lines are painted on the asphalt, constant re-striping is required ever 12-18 months.
Signage
Not only will your lot begin to deteriorate, but often signs are knocked down, dented, vandalized or even stolen. It is important to properly maintain your signs – not only for that instant curb appeal, but also for safety.
Wheel Stops
Wheel stops play an integral role in maintaining clear sidewalks and protecting signs. If your wheel stops are damaged, it could negatively affect everything around them.
Now you are well on your way to a beautiful, long lasting parking surface.
If you have any questions, please contact PTG Enterprises by calling 443-463-1536 or click here today!
Tags: asphalt, Asphalt cracks, Asphalt Maintenance, asphalt maryland, crack fill, fill cracks, Maintenance, My Pavement Guy, pavement, Pavement cracks, Pavement Maintenance, Pavement Maryland, Preventative maintenance, PTG Enterprises, Re-striping, re-striping asphalt, re-striping pavement, Sealcoating, Sigsn, Wheel Stops
Posted in General Asphalt Advice | Comments Off on Pavement Maintenance