Blog

Posts Tagged ‘repaving’

Repairing vs. Repaving an Asphalt Parking Lot

Friday, April 25th, 2014

Over time, your asphalt parking lot takes a beating. And we don’t have to tell you (but we will) just how bad this past winter was for your asphalt. The snow, ice, and freezing temperatures took their toll on your parking lot, due to what is known as the freeze-thaw cycle. Water penetrates your asphalt through cracks, no matter how small, freezes and expands, and causes those cracks to worsen. This happens several times over the average winter. After a winter like the one we just had in Baltimore, the damage is multiplied, leaving business owners with excessive cracking, potholes, and other forms of asphalt damage. So what do you do?

Repairing vs. Repaving an Asphalt Parking Lot

When all is said and done, the condition of your parking lot, as well as your budget, will determine the extent of the project. Some will require a total excavation and replacement, while others can get away with a little patchwork and some crack filling. You need to evaluate the cost of maintaining the deteriorating pavement over time vs. the cost of replacement. PTG Enterprises can help you make that determination. We will evaluate your parking lot and produce a cost base analysis to determine whether repairs or replacement makes the most sense for you and your business.

Asphalt Repairs

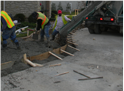
If the damage isn’t too bad, you may be able to get by with asphalt patching, pothole repair, and crack filling. Asphalt maintenance will help extend the useful life of your asphalt, saving you both heartache and money. However, there comes a time when repairs no longer make sense financially. When this happens, total replacement may be your best option.

Total Excavation and Replacement

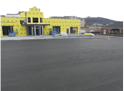
Asphalt is not indestructible. It will not last forever. In fact, even with regular maintenance, your asphalt parking lot will only last 15-20 years. There eventually comes a time when every parking lot has outlived its useful life, when it is more cost effective to excavate the lot and repave.

Repaving Asphalt Parking Lot

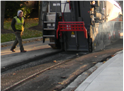
The entire parking lot is machine excavated, usually by an asphalt milling machine, but this can vary with the size and shape of the lot. Once excavation is completed, the sub-grade stone is evaluated for its condition. Any soft spots will be undercut and new stone installed. Then the base and surface courses of asphalt are re-installed. With this option, the life cycle of the parking lot is reset to zero. The lot is brand new.

Trust PTG Enterprises

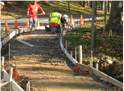
PTG Enterprises is a full service commercial asphalt contractor in the Baltimore, Maryland area. We have been in the asphalt paving business for more than a decade, paving thousands of miles of asphalt lots. Our crews work quickly and professionally.

If you have any questions about Repairing vs. Repaving an Asphalt Parking Lot, please contact PTG Enterprises aka My Pavement Guy today by calling 410-636-8777, or click here today! You can also follow PTG Enterprises on Facebook and Twitter!

How to Repair Your Old Asphalt Driveway

Thursday, August 11th, 2011

Is your driveway in rough shape? Will repairs do the trick? Does it need to be resurfaced? Should you have it redone professionally? These are all questions that homeowners ask themselves when faced with a dilapidated driveway. Ultimately the best thing to do is the contact a professional like My Pavement Guy, but there are some things you can consider on your own.

According to this article on EzineArticles there are some important things to think about before consulting your contractor:

Maintenance is good medicine, but it’s not foolproof

Asphalt driveways don’t remain smooth and black forever. You can take steps to maintain your driveway by sealing and protecting it, but often the effects of heat, ultra-violet rays, and substances such as salt, oil, gas and grease take their toll. And if those don’t get you, then cracking and water penetration eventually will.

Your driveway may be corroded, worn out, or have cracks, which could all warrant a resurfacing job if the condition is severe enough. As a general guide, if repairs are needed on more than 25 percent of the surface, it is more cost-effective to do a hot mix asphalt resurfacing job over the entire driveway.

Say no to cracks!

Asphalt pavement is hard and brittle, and as a result, cracks will develop over time. Ranging from hairline to an inch wide or more, cracks are your driveway’s worst enemy because they let water in. In colder climates, freeze-thaw cycles can be very destructive, and can wreak havoc on your driveway if water penetrates the cracks, then expands as it turns to ice. And even in warmer climates, water penetration can cause serious damage. The larger the crack, the more serious the problem, and the sooner it needs to be fixed. Cracks that are left un-repaired will lead to serious deterioration of the pavement and even to the base layers, requiring complete replacement of the driveway – sooner rather than later in colder climates.

Can it be fixed or do you need a new driveway?

Whether you’ll need to rip out your existing driveway and install a new one, or if you can get away with resurfacing – or even some patchwork and crack-filling – depends largely on the condition of the base layers, or foundation. However, if cracking covers 3/4 of the driveway, the surface is too far gone to repair. The root of the problems may come from lower down, and a complete overhaul should be considered.

If your driveway has been resurfaced several times with hot mix asphalt and keeps deteriorating prematurely, it is likely a problem with the foundation, and you should consider installing a whole new driveway. Likewise, if there are areas that have depressions or mounds, they should be completely reconstructed from the base. If you have several of these areas, a new driveway might make sense.

For any of your asphalt needs or if you have any questions, contact PTG Enterprises aka My Pavement Guy by calling 410-636-8777 or click here

Check us out on Facebook and Twitter as well!

Pothole Repair: It’s a Bigger Job Than You May Think

Friday, June 24th, 2011

It’s a hole in the road. How hard can it be to fill a hole, right? Well, you might be surprised. Pothole repair is tough work and requires a trained crew and some specialty equipment. This article from PaveManPro.com explains the lengthy repair process.

How to repair a pothole:

1. With a pavement saw or pneumatic hammer, cut the outline of the patch, extending at least 0.3 m (I ft.) outside of the distressed area. The outline should be square or rectangular with two of the sides at right angles to the direction of traffic.

2. Excavate as much pavement as necessary to reach firm support. If a patch is to be an integral part of the pavement, its foundation must be as strong or stronger than that of the original roadway. This may mean that some of the sub-grade will also have to be removed. The faces of the excavation should be straight and vertical.

3. Trim and compact the sub-grade.

4. Apply a tack coat to the vertical faces of the excavation.

5. Backfill with the asphalt mixture. Using a shovel or skid steer loader place the mixture directly from the truck into the prepared excavation. The maximum lift thickness largely depends upon the type of asphalt mixture and the available compaction equipment. Asphalt concrete can and should be placed in deep lifts, since the greater heat retention of the thicker layers facilitates compaction. From a compaction standpoint, patches using asphalt concrete can be backfilled in one lift. However, when placing a patch that is deeper than 3 cm (5 in.) it is often useful to leave the first lift 2.5 to 5 cm (I to 2 in.) below the finished grade, making it easier to judge the total quantity of mixture required for the patch.

On the other hand, patches constructed with mixtures containing emulsified or cutback asphalt must be placed in layers thin enough to permit evaporation of the diluents that make the mixture workable.

6. Spread carefully to avoid segregation of the mixture. Avoid pulling the material from the center of the patch to the edges. If more material is needed at the edge, it should be deposited there, and the excess raked away. The amount of mixture used should be sufficient to ensure that the after compaction the patch surface will not be below that of the adjacent pavement.  On the other hand, if too much material is used a hump will raise.

7. Compact each lift of the patch thoroughly. Use equipment that is suited for the size of the job.  A vibratory plate compactor is excellent for small jobs, while a vibratory roller is likely to be more effective for larger areas. When compacting the final lift (which may be the only lift), overlap the first pass and return of the vibratory roller or plate compactor to no more than 5 cm (6 in.) on to the patch on one side. Then move to the opposite side and repeat the process. Once this is accomplished, proceed at right angles to the compacted edges, with each pass and return overlapping a few inches on to the uncompacted mix. If there is a grade, compaction should proceed from the low side to the high side to minimize possible shoving of the mix.

8. When adequate compaction equipment is used, the surface of the patch should be at the same elevation as the surrounding pavement. However, if hand tamping or other light compaction methods are used, the surface of the completed patch should be slightly higher than the adjacent pavement, since the patch is likely to be further compressed by traffic.

9. Check the vertical alignment and smoothness of the patch with a straightedge or string line.

So next time you complain about that pothole down the street not getting fixed or next time you think to yourself, “hey, I could do that in half the time,” remember that pothole repair is not a quick fix. Properly patching a pothole takes time, know-how, and a lot of energy.

If you have any questions, contact PTG Enterprises by calling 410-636-8777 or click here

Check us out on Facebook and Twitter as well!

How to Rid Yourself of Pavement Ants in Your Driveway

Wednesday, May 18th, 2011

Pavement ants, also known as house ants or sugar ants, can be quite a nuisance. They set up camp in your yard or inside the cracks in your pavement and eventually work their way into your home. The best thing to do when you find pavement ants is to rid yourself of the infestation as soon as possible.

But how can you do that? You are no exterminator and you don’t want to have to run to the hardware store to buy ant spray, right? Well, you can use one household item to help assist you in your quest for an ant free existence – salt.

That’s right, all you need is everyday salt. This article from eHow.com explains several solutions to rid yourself of those pesky pavement ants using nothing but common table salt.

1.   Sprinkle ordinary table salt on cracks in the driveway, along the sides and where the ants are present. Make sure the driveway and surrounding areas are dry before applying salt for the best effectiveness.

2.   Repeat weekly until the ants are gone. After consuming the salt, the ants will drink water or other moisture until they essentially explode. Be aware that the salt will also kill any weeds or plants present, so use caution.

3.   Draw a line with salt at the end of the driveway on the pavement to prevent the ants from crossing over into the lawn or home.

4.   If table salt is not effective, purchase a sweet ant bait trap that contains boric acid salt. (Boric acid is a hydroponic salt.) The ants are attracted to the sugar in the bait, consume the boric acid salt with the sugar, and then take the poison back to their home, where it spreads to the other ants.

5.   Place the ant baits along the sides and ends of the driveway. Use caution when using ant baits because boric acid can be toxic to pets and humans as well as insects.

If you have any questions, contact PTG Enterprises by calling410-636-8777 or click here today!

The importance of written contracts

Sunday, January 30th, 2011

In a recent post, we advised organizations looking to hire the right contractor for a paving project to make sure they get any contracts in writing. While a written contract is important, it’s worthless if it doesn’t contain the right information. All written contracts should include:

  • a date when the work will begin.
  • details of the improvements that will be made.
  • the quality of the materials to be used.
  • an estimated date for completion.
  • terms for making payments.

Organizations should make sure they read the contracts carefully including any fine print. If the contract language doesn’t agree with the organization’s understanding, they shouldn’t sign it. For more on paving projects, visit our education page and contact us.

Try reverse bidding instead of RFP

Sunday, January 23rd, 2011

If you need to bid out a paving project but don’t want to go the request for proposal (RFP) process, you can try reverse bidding.  Reverse bidding is especially helpful for organizations whose budget isn’t large enough to accomplish all of its projects.

With reverse bidding, the organization reveals to potential contractors its budget for the project from the outset.  The bidders then submit the amount of work they can get done for the budgeted amount.  The organization then picks the contractor who can accomplish the most goals.

You can read more about reverse bidding on our education page, including how organizations can utilize the process over several years to finish a large, expensive project.  Then, for help on paving and repaving work, contact us.

Does my paving work require an RFP?

Friday, January 14th, 2011

For commercial paving and repaving work, clients issue a request for proposal (RFP) to a number on contractors. This is by no means the only method for obtaining bids on a pavement project, but it is an accepted and popular one. Here are a few things to keep in mind about the RFP process.

  • An independent professional should assist with creating the RFP. This could be a pavement consultant, reverse study engineer, or a contractor you trust.
  • A pre-bid meeting with the three to five contractors who received the RFP is standard procedure. Other stakeholders requesting the bid should be part of the meeting, which should be a Q&A session to make sure everyone understands the scope of the work.
  • The RFP should be open for editing during the pre-bid meetings.

The advantage of going through the RFP and pre-bid process is that everyone leaves the meetings understanding the work that needs to be done. That way, when the bids come back they’ll be easy to compare. You can learn more by visiting our education page. For more on paving or to get help with your paving project, contact us.

Hiring the right pavement contractor

Friday, January 7th, 2011

So your driveway, parking lot, or other roadway has been beat up or worn to the point that it needs to be fixed and repaved. It’s definitely a project you can’t tackle on your own, so you need to find a contractor to do the job. How can you be sure you find the right one? Here are six easy tips.

  1. Make sure your contractor has its proper licenses.
  2. Ask the contractor for references and check with those references.
  3. Look for contractors who offer a warranty with their work and get that warranty in writing.
  4. Ask to see the contractor’s certificate of insurance.
  5. Do not pay more than one third of the cost in advance (which is typically illegal anyway) and avoid contractors who pay only in cash.
  6. Always get the contract for the work in writing.

For more on these points, please visit the education section of our site. Then contact us to get your paving work done. We’re licensed, insured, put everything in writing, and would be happy to supply references.